Tuesday, March 31, 2009

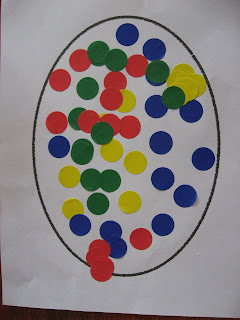
Easter Activity 3 - Easter Chick, Lamb and Egg

THE EASTER EGG:

Materials:
  1. Print out this egg (use bigger scale)
  2. Colored coding labels

My daughter had a lot of fun with this activity!
And this is how her first Easter Egg looks like! And no mess in the kitchen!

Easter Activity 2 - Easter Chick, Lamb and Egg

THE LAMB:
  1. For this activity I printed out this page
  2. Cotton balls
  3. Glue

Here you can see how she made it. The pictures are self explanatory.


My daughter loves to "pet" the lamb. She loves that it is so soft...

Easter Activity - Easter Chick, Lamb and Egg

EASTER CHICK:

You don't need a lot for this activity....just cut and paste...

  1. A coloring page of a chick (I found this one here)
  2. Different type of material (I used paper, cardboard, corrugated cardboard, foam)
  3. Scissors and Glue

Cut
Paste

All done!

Thursday, March 26, 2009

Cute Egg Holder for Easter


Do you want to know about a nice way to start talking about Spring? Easter? Or maybe practice geometry? Or just paint? I am sure you have all the materials at home to make these Cute Egg Holders!

What you need is:
  1. One toilet roll
  2. Print one of these attachments (colored or blank available)
  3. Paint and colours
  4. Scissors / Glue
  5. Eggs, if you like.
Here you can download the PDF Files.


If it is too dificult to cut the eyes with the scissors, you can use the Push-Pin tecnique.
When she was ready I asked her which ones were circles, how many were there...until she got borred of so many questions!
The best part is to put this puzzle together! And glue...
We made the egg holder with a toilet roll cut in 2 and we painted it.
All done....

Tuesday, March 24, 2009

How to Cut Paper without Scissors?


One of my daughter’s favorite activity is to cut paper and most of the time I give her the scissors. But sometimes she gets frustrated when she wants to cut out an object with “not so much straight lines”.... For that there is no better solution than using a jumbo pin push and a cork or felt like they taught her at school.

To push pin the outline is difficult but with a little practice we can! And how much fun is it to pull away the surrounding paper and to see that what you have in your hands is the same shape as the drawing on the paper where you have to glue it on!

After we push pin it, we glue it on the alphabet
And this is how it starts to look like...
Muakmuak!

Thumb sucking? Play this!


My daughter sucked her thumb ever since she was a little baby and we have always tried to make her stop. Now that she is a little older and understands a little more about her surrounding, we have started talking about being sick, germs, fingers in your mouth, etc...It’s been a week since she has not sucked her thumb! I thought it would be almost impossible, that she would cry the whole day, but she has been working really hard to not forget about her thumb and she feels really proud every time we tell her she is doing a great job. Sometimes she forgets, but then she remembers and smiles...
We have been trying to help her by playing games together that keep her hands occupied and where she can be distracted and not have any intention of putting her thumb in her mouth (normally she sucked her thumb without even realizing she was doing it). These games include puzzles, painting or jumping on the bed! (don’t worry, it is just a mattress on the floor in her play area!)

I found an activity in a Montessori book a long time ago, which I think is a great game for this occasion and started making it.

What you need is:
  • 2 string bags ( I didn’t have bags at home and since I had some fabric, I decided to sew and make them myself)
  • Several matching objects.
  • If you want and your child feels it is comfortable, a blindfold

These are some of the matching objects I found and put inside the bags
I used different colors for the decoration on the bags
Here you can see the game. The Mystery Bag activity involves asking a child, blindfolded or with eyes closed, to put both hands in a bag and identify an object inside.
Another possibility is the matching game. You use both bags. First, again blindfolded or eyes closed, the child pulls out a piece and then he/she has to pull out from the other bag the matching one. This matching game helps children refine their visual and tactile senses.

Here you can see how my daughter plays this game:
First she pulls out the first piece
Try to find the match....
Here it is! (Look how happy she is!)
We are almost there!
All done!
One more time Mommy?

This was a perfect way to play, learn and not sucking her thumb! Today she even felt asleep without this bad habit!

From coffee table to drawing table.

We had at home this old coffee table that we didn’t want to trow away and nobody wanted to have it, so we had a great idea! We could make a drawing table for our little one! My daughter loves to paint, draw and everything that has to do with colors. My husband worked on it and made this fantastic table!
The coffee table before...
IMG_7775
The drawing table after!
IMG_7774
This is her creativity table!

Some details:
  • You can find the paper at Ikea for just $6!
  • The little colored cups also at Ikea for just $ 1.99 (6 cups!)
  • The cups are in a rounded opening we made so they don’t fall. Also, easy to take out, for example, to pour water for watercolors or other kind of paint...or just clean them.
  • The box filled with crayons is attached to the table. This means...no crayons on the floor...
  • We putted a clip so it could hold the paper
A clip that hold the paper

The holes for the cups
Using a larger cup, I filled it with a little water so we could clean the brushes.
IMG_7776


A drawer attached that doesn't open or close...perfect for her coloring books!