Tuesday, May 25, 2010

Letter X is for Xylophone

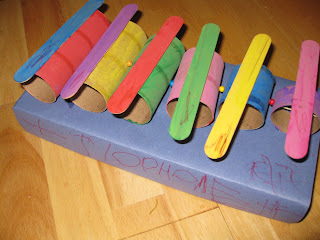
We are almost done with the Alphabet!! Letter X was a really difficult one, but we found some great ideas on the Internet. X is for Xylophone! First we made a Xylophone using toilet paper rolls...this is not a Xylophone that's really going to make music but the idea is to create, use your imagination and have fun! This is how we did it:

PAPER ROLL XYLOPHONE


We used 4 toilet paper rolls (We made the rolls each time smaller. The 2 littlest ones, are the part of the third and fourth roll. You can use scotch to close them)


All we needed was:

  • Toilet paper rolls
  • Paint
  • Glue
  • Jumbo sticks
  • Needle
  • Yarn
  • Beads ( if you like)


    Before painting, I made a little hole in the toilet paper rolls. Now we can "sew" them together after they are painted.
    My daughter painted each toilet paper rolls and the sticks with a different color.


    We sewed the toilet paper rolls using the beads in this step. 
    She glued the jumbo stick on each roll (you can  match it or let your child be original...mine wanted to be creative. That's OK with me!)

    You can leave it like this and have a mobile, but we glued it on a  wrapped shoebox cover and my daughter wrote the word Xylophone all by herself! This was for me the best part of this project... :-)


    WATER BOTTLES XYLOPHONE

    Another type of Xylophone (that actually works!) is this one! My daughter really loved this one! We used 6 glass bottles, water and food coloring.

    You just need one drop of paint and water. Pour as much water as you want. You can leave them like that or put the lid on. And now just play! 


    Isn't it cute to see the faces of your children when they realize they have just created something so cool??


    Friday, May 21, 2010

    Letter W is for Watermelon!


    Al you need for these delicious Watermelons is a paper plate, some red and green paint, glue and some Watermelon seeds you can buy in any garden shop.

    My daughter loved this activity and reminded her dad that these Watermelon were not for eating...they are just pretend...I guess she said that because they look just like real Watermelons!

    Here is how you do it.

    Fold the paper plate in 2


    Open it again and paint the center red and the border of the plate with green paint


    Glue the seeds


    Fold it back a little bit...Enjoy your Watermelon!


    Tuesday, May 18, 2010

    Letter V - Vegetalbe Print and Venus

    This week, letter V.


    VEGETABLE PRINT
    We made a painting using as brushes and stamps some vegetables. 
    We used carrots, broccoli, peas, cauliflower, zuchinni, and a potato. The idea is to dip the vegetable into the pains and stamp them onto paper.
    My daughter had so much fun! The lettuce was a BIG brush, the peas rolled and made a nice line. There are lots of vegetables and some have realy nice prints (maybe nicer than the once we used), so try it.
    We loved the brocolli and peas pattern! 

    I used a potato to make a stamp.  I cut the potato in half. On the cut face of the potato, I used a knife to carve the letter V. I cut away the potato surrounding the shape, so that it end up with an aprox. 1/5 inch shape. 

    Here you can see the letter V print made with the potato.


    VENUS

    Remember the coffee filter, markers and water activity (Umbrella)? Or the Earth activity This time we made Venus!

    We colored a coffee filter with red, orange and pink markers. Put some water on it and let it dry...that's all! 

    Thursday, May 6, 2010

    Step by Step Mother's Day Paper Tulips Bouquet Craft


    Mother's Day is next Sunday! And we made these Tulips for Grandma and Auntie...
    (and some will stay here at home! A little present for myself)


    Since there is no much time left, just take a look at the pictures and make a colorful bouquet to be given as a gift!


    STEP BY STEP

    Step 1 - Make squares using construction paper (4.5 inch X 4.5 inch / 11.5 cm X 11.5 cm)


    Step 2 - Fold the paper in 2, then again. Both sides. You will have now 4 X 4 = 16 little squares.


    Step 3 - Cut where you see the lines. Then fold in 4 and cut a little in the right corner so that you get a tiny hole once you open it.

    You should have something like this.


    Step 4 - Put glue only on the squares where you see the arrow.


     Step 5 - Paste it like this, overlapping the other square next to the arrow.


    This is what you should have.


    Step 6 - To make the stem, have some green construction paper. (6 inch X 3 inch - 22.5cm X 7.5cm)

    Step 7 - Use a pencil to roll it lenghtwise.

    Step 8 - Put some glue on top. Remember to take out the pencil after you glue it :-)

    Step 9 - Cut the stem like this

    Step 10 - Put the stem inside the tulip and fold the tip

    This is how it looks inside the tulip

    Your tulip is ready

    Step 11 - For the leaves, you can do anything you like. The leaves are a little bit folded in half.

    Step 12 - To make this effect, I pasted the bottom like this

    Make a nice Mother's Day card, a vase (this one is made of a Parmesan Cheese Bottle) and done!

    HAVE A WONDERFUL MOTHER's DAY!